引言
JDBC(Java DataBase Connectivity)是Java连接数据库的的方法;其实本质就是SUN公司定制的一套接口,这样就可以实现Java和各种不同数据库间的连接,如下图:

注:本文使用IDEA示范,数据库使用的是MySQL数据库;
IDEA导入数据库连接Jar包步骤
首先我们要先有对应的MySQL数据库连接驱动jar包,没有的可以评论区找我要;
正常创建一个IDEA项目,如图:
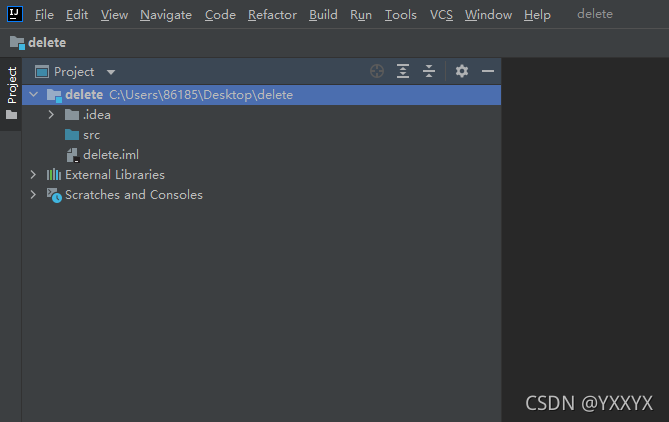
接下来就按图操作导入jar包;

这样我就创建了一个名为lib的文件夹,然后把 mysql-connector-java-8.0.16.jar 粘贴到lib目录下;
如图:

最后一步把jar包导入到项目中,即右键该jar包,再点击Add as Library;

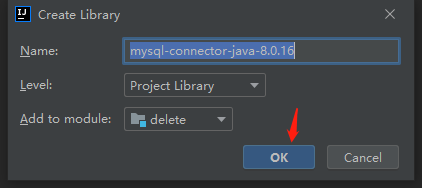
这样就导入jar包了;
接下来就是JDBC的基本操作;
JDBC编程操作
JDBC在Java代码中可以总结为五个操作步骤:
- 注册驱动(确定连接的数据库)
- 获取连接(打开JVM进程和数据库进程之间的通道)
- 获取数据库操作对象(可以用来执行sql语句)
- 执行SQL语句(如果是select查询语句那么需要处理查询结果)
- 释放资源(关闭第二步开启的进程通道)
我自己先创建了一个test02数据库,其中一个表为t_user,如图:

下面就来展示一下使用JDBC实现连接数据库的登录操作(存在问题):
package jdbctest01;

import java.sql.*;
import java.util.HashMap;
import java.util.Map;
import java.util.Scanner;

/*
    模拟实现用户登录功能
    存在SQL注入问题,不安全;
*/
public class JdbcTest01 {
    public static void main(String[] args) {
        // 初始化界面
        Map<String, String> userLoginInfo = initUI();
        // 验证用户名和密码
        boolean loginSuccess = login(userLoginInfo);
        System.out.println(loginSuccess ? "登录成功" : "登录失败");
    }

    /**
     * 验证用户名和密码
     * @param userLoginInfo 用户登录信息
     * @return false表示失败, true表示成功
     */
    private static boolean login(Map<String, String> userLoginInfo) {
        boolean loginSuccess = false; // 标记
        String loginName = userLoginInfo.get("loginName"); // 获取用户名
        String password = userLoginInfo.get("password"); // 获取登录密码
        // JDBC代码
        Connection connection = null;
        Statement statement = null;
        ResultSet resultSet = null;
        try {
            // 注册驱动
            Class.forName("com.mysql.cj.jdbc.Driver");
            // 获取连接
            connection = DriverManager.getConnection("jdbc:mysql://localhost:3306/test02?serverTimezone=UTC", "root", "020216");
            // 获取数据库操作对象
            statement = connection.createStatement();
            // 执行sql语句
            String sql = "select * from t_user where loginName = '"+ loginName +"' and loginPwd = '"+ password +"'";
            resultSet = statement.executeQuery(sql);
            // 处理结果集
            if (resultSet.next()) {
                loginSuccess = true;
            }
        } catch (ClassNotFoundException | SQLException e) {
            e.printStackTrace();
        } finally {
            // 释放资源(按顺序释放)
            if (resultSet != null) {
                try {
                    resultSet.close();
                } catch (SQLException e) {
                    e.printStackTrace();
                }
            }
            if (statement != null) {
                try {
                    statement.close();
                } catch (SQLException e) {
                    e.printStackTrace();
                }
            }
            if (connection != null) {
                try {
                    connection.close();
                } catch (SQLException e) {
                    e.printStackTrace();
                }
            }
        }
        return  loginSuccess;
    }

    /**
     * 初始化用户界面
     * @return 用户输入的用户名和密码等登录信息
     */
    private static Map<String, String> initUI() {
        Scanner scan = new Scanner(System.in);

        // 输入用户名;
        System.out.print("用户名:");
        String userName = scan.nextLine();

        // 输入密码;
        System.out.print("密码:");
        String password = scan.nextLine();

        // 放入map
        Map<String, String> userLoginInfo = new HashMap<>();
        userLoginInfo.put("loginName", userName);
        userLoginInfo.put("password", password);
        return userLoginInfo;
    }
}
这样就实现了一个登录功能
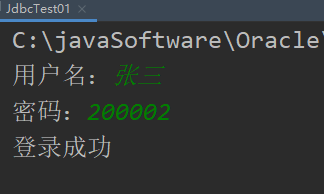
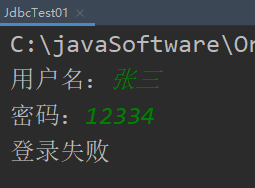
但是这样存在SQL注入问题,SQL注入可以自己搜集资料了解一下,简而言之就是不安全,我示范一下:
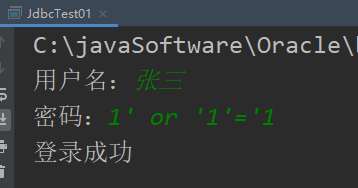
可以看到,张三密码是200002,但是我却可以通过SQL注入语句1' or '1'='1登录成功,这样就存在着很大的问题;
为了解决SQL注入问题,可以使用如下方法:
代码如下:
package jdbctest01;

import java.sql.*;
import java.util.HashMap;
import java.util.Map;
import java.util.Scanner;

/*
解决SQL注入问题
 */
public class JdbcTest02 {
    public static void main(String[] args) {
        Map<String, String> userLoginInfo = initUI();
        boolean loginSuccess = login(userLoginInfo);
        System.out.println(loginSuccess ? "登录成功" : "登录失败");
    }

    private static boolean login(Map<String, String> userLoginInfo) {
        boolean loginSuccess = false;
        String userName = userLoginInfo.get("userName");
        String password = userLoginInfo.get("password");
        Connection connection = null;
        PreparedStatement preparedStatement = null;
        ResultSet resultSet = null;
        // JDBC代码
        try {
            // 注册驱动
            Class.forName("com.mysql.cj.jdbc.Driver");
            // 获取链接
            connection = DriverManager.getConnection("jdbc:mysql://localhost:3306/test02?serverTimezone=UTC", "root", "020216");
            // 获取数据操作对象(这里就不同了)?是占位符
            String sql = "select * from t_user where loginName = ? and loginPwd = ?";
            preparedStatement = connection.prepareStatement(sql);
            preparedStatement.setString(1, userName); // 设置第一个占位符?为username
            preparedStatement.setString(2, password); // 设置第二个占位符?为password
            // 执行sql语句
            resultSet = preparedStatement.executeQuery();
            // 处理结果集
            if (resultSet.next()) {
                loginSuccess = true;
            }
        } catch (ClassNotFoundException | SQLException e) {
            e.printStackTrace();
        } finally {
            // 释放资源
            if (resultSet != null) {
                try {
                    resultSet.close();
                } catch (SQLException e) {
                    e.printStackTrace();
                }
            }
            if (preparedStatement != null) {
                try {
                    preparedStatement.close();
                } catch (SQLException e) {
                    e.printStackTrace();
                }
            }
            if (connection != null) {
                try {
                    connection.close();
                } catch (SQLException e) {
                    e.printStackTrace();
                }
            }
        }
        return loginSuccess;
    }
    private static Map<String, String> initUI() {
        Scanner scan = new Scanner(System.in);
        System.out.print("请输入用户名:");
        String userName = scan.nextLine();
        System.out.print("请输入密码:");
        String password = scan.nextLine();
        Map<String, String> userLoginInfo = new HashMap<>();
        userLoginInfo.put("userName" , userName);
        userLoginInfo.put("password", password);
        return  userLoginInfo;
    }
}
SQL注入失败:
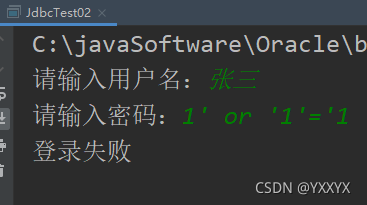
可以发现主要区别是获取数据库操作对象时不再使用Statement,而使用PreparedStatement,这样就可以解决SQL注入问题;所以实际情况下,使用PreparedStatement会更多,还有占位符操作,也很简单,代码中有注释,自己尝试一下就明白了;代码可以多看几遍找找区别;
这就是JDBC最基础的操作,其实就是这几个固定步骤,实在不理解先记住就行了,之后用多了就会明白了;
接下来我们将JDBC的一些操作进行封装;
自定义JDBC工具类
在这里我们将注册、连接、关闭操作封装起来,构成一个工具类;
代码有详细注释;
package jdbctest01.mytest;

import java.sql.*;

/*
    JDBC工具类,简化JDBC编程
*/
public class DBUtil {
    /**
     * 工具类中的构造方法是私有的
     * 因为工具类中的方法都是静态的,直接通过类名去调即可。
     */
    private DBUtil(){}

    /**
     * 静态代码块,类加载的时候执行
     * 把 注册驱动 程序的代码放在静态代码块中,避免多次获取连接对象时重复调用
     */
    static {
        try {
            Class.forName("com.mysql.cj.jdbc.Driver");
        } catch (ClassNotFoundException e) {
            e.printStackTrace();
        }
    }

    // 获取连接
    public static Connection getConnection() throws SQLException {
        return DriverManager.getConnection("jdbc:mysql://localhost:3306/test02?serverTimezone=UTC", "root", "020216");
    }

    // 关闭方法
    public static void close(Connection connection, Statement statement, ResultSet resultSet) {
        if (resultSet != null) {
            try {
                resultSet.close();
            } catch (SQLException e) {
                e.printStackTrace();
            }
        }
        if (statement != null) {
            try {
                statement.close();
            } catch (SQLException e) {
                e.printStackTrace();
            }
        }
        if (connection != null) {
            try {
                connection.close();
            } catch (SQLException e) {
                e.printStackTrace();
            }
        }
    }
}
这个操作也可以自己实现一下,并不难;
这里值得一提的就是注册驱动放到了静态代码块中,这样就在保证调用的同时避免重复调用;
CRUD操作
对于数据库的操作其实最常用的还是增删改查,但是每次都重写代码实在是复杂,所以这里同样可以自己封装一个增删改查操作;这里还是使用之前的test02数据库,这里是对bank表进行的操作;bank表如图:

接下来是我自己封装的一个增删改查操作代码(这里使用了DBUtil工具类):
package jdbctest01.mytest;

import java.sql.Connection;
import java.sql.PreparedStatement;
import java.sql.ResultSet;
import java.sql.SQLException;
import java.util.List;

// 针对一个表尝试封装增删改查操作
public class CRUD {
    /**
     * 实现给bank表增加数据的操作
     * @param num 主键值
     * @param user 用户名
     * @param money 存款数目
     * @return 返回值为执行sql的数目
     * @throws SQLException DBUtil.getConnection()的异常处理
     */
    public static int add(int num, String user, int money) throws SQLException {
        Connection connection = null;
        PreparedStatement preparedStatement = null;
        // 注册驱动并获取链接
        connection = DBUtil.getConnection();
        // 获取数据操作对象
        String sql = "insert into bank(num, user, money)values(?, ?, ?)";
        preparedStatement = connection.prepareStatement(sql);
        preparedStatement.setInt(1, num); // 第一个占位符?为num
        preparedStatement.setString(2, user); // 第二个占位符?为user
        preparedStatement.setInt(3, money); // 第三个占位符?为money
        // 执行sql语句
        int count = preparedStatement.executeUpdate(); // 执行insert语句
        // 释放资源
        DBUtil.close(connection, preparedStatement, null);
        return count;
    }

    /**
     * 实现bank表的删除操作
     * @param num 主键值
     * @return 返回执行sql的数目
     * @throws SQLException DBUtil.getConnection()的异常处理
     */
    public static int delete(int num) throws SQLException {
        Connection connection = null;
        PreparedStatement preparedStatement = null;
        connection = DBUtil.getConnection();
        String sql = "delete from bank where num = ?";
        preparedStatement = connection.prepareStatement(sql);
        preparedStatement.setInt(1, num);
        int count = preparedStatement.executeUpdate(); // 执行delete语句
        DBUtil.close(connection, preparedStatement, null);
        return count;
    }

    /**
     * 实现对bank指定数据的更新
     * @param num 主键值
     * @param user 用户名
     * @param money 存款数目
     * @return 返回执行sql的数目
     * @throws SQLException DBUtil.getConnection()的异常处理
     */
    public static int update(int num, String user, int money) throws SQLException {
        Connection connection = null;
        PreparedStatement preparedStatement = null;
        connection = DBUtil.getConnection();
        String sql = "update bank set user = ?, money = ? where num = ?";
        preparedStatement = connection.prepareStatement(sql);
        preparedStatement.setString(1, user);
        preparedStatement.setInt(2, money);
        preparedStatement.setInt(3, num);
        int count = preparedStatement.executeUpdate(); // 执行update语句
        DBUtil.close(connection, preparedStatement, null);
        return count;
    }

    /**
     * 实现对bank表中对应数据的查询
     * @param num 主键值
     * @return 返回ResultSet值,对应的查询结果
     * @throws SQLException DBUtil.getConnection()的异常处理
     */
    @Deprecated
    public static ResultSet select(int num) throws SQLException {
        Connection connection = null;
        PreparedStatement preparedStatement = null;
        ResultSet resultSet = null;
        connection = DBUtil.getConnection();
        String sql = "select * from bank where num = ?";
        preparedStatement = connection.prepareStatement(sql);
        preparedStatement.setInt(1, num);
        resultSet = preparedStatement.executeQuery(); // 执行select语句
        if (resultSet.next()) {
            System.out.println("num:" + resultSet.getInt("num") +
            " user:" + resultSet.getString("user") + " money:" + resultSet.getInt("money"));
        }
        DBUtil.close(connection, preparedStatement, resultSet);
        return resultSet;
    }

    /**
     * 实现对bank表中对应数据的查询
     * @param num 主键值
     * @return 返回一个Bank类型对象
     * @throws SQLException DBUtil.getConnection()的异常处理
     */
    public static Bank selectElem(int num) throws SQLException {
        Connection connection = null;
        PreparedStatement preparedStatement = null;
        ResultSet resultSet = null;
        Bank bank = new Bank();
        connection = DBUtil.getConnection();
        String sql = "select * from bank where num = ?";
        preparedStatement = connection.prepareStatement(sql);
        preparedStatement.setInt(1, num);
        resultSet = preparedStatement.executeQuery(); // 执行select语句
        if (resultSet.next()) {
            bank.setNum(resultSet.getInt("num"));
            bank.setUser(resultSet.getString("user"));
            bank.setMoney(resultSet.getInt("money"));
        }
        DBUtil.close(connection, preparedStatement, resultSet);
        return bank;
    }
}
这里也要注意到一点:当执行select查询语句时,使用的是executeQuery()方法,而增删改都是使用的executeUpdate()方法;
总结
JDBC其实并没有多少东西,其实总的就是那几步操作,可能刚一接触会有点懵,习惯就好了;
这里还是想提一下:代码只是参考,我希望你可以通过我的代码了解到操作方法,可以自己去创建一个数据库尝试;
当然有问题或者想要相关资源评论区可以留言,希望这篇文章可以给你带来帮助!!!
欢迎大家的点评!
