
2021SC@SDUSC
目录
一、Window模块
二、代码分析
zbar_window_redraw
亮度感应及曝光
感光宽容度
自动曝光和18%灰
gamma校正
窗口图层覆盖
三、总结
一、Window模块

要使用ZBar进行条码识别的时候,输入的可以是视频流也可以是图像流。
在采用视频流进行输入的情况下,我们往往采取的方式是打开摄像头窗口进行扫码识别。在摄像头捕获到的视频信息中,ZBar需要对视频信息进行一系列的采集和处理,如逐帧捕获等等。Window模块会将处理后的信息交给其他模块进行解码等处理。
采用图像输入时,也需要Window模块的参与,这会在后续代码分析中提到。
这部分功能的实现并不是由Video模块实现,而是在ZBar打开窗口时,由Window模块进行实现的。这样的模块分离,使得整个项目的结构更加清晰,各模块之间的分工更加明确。
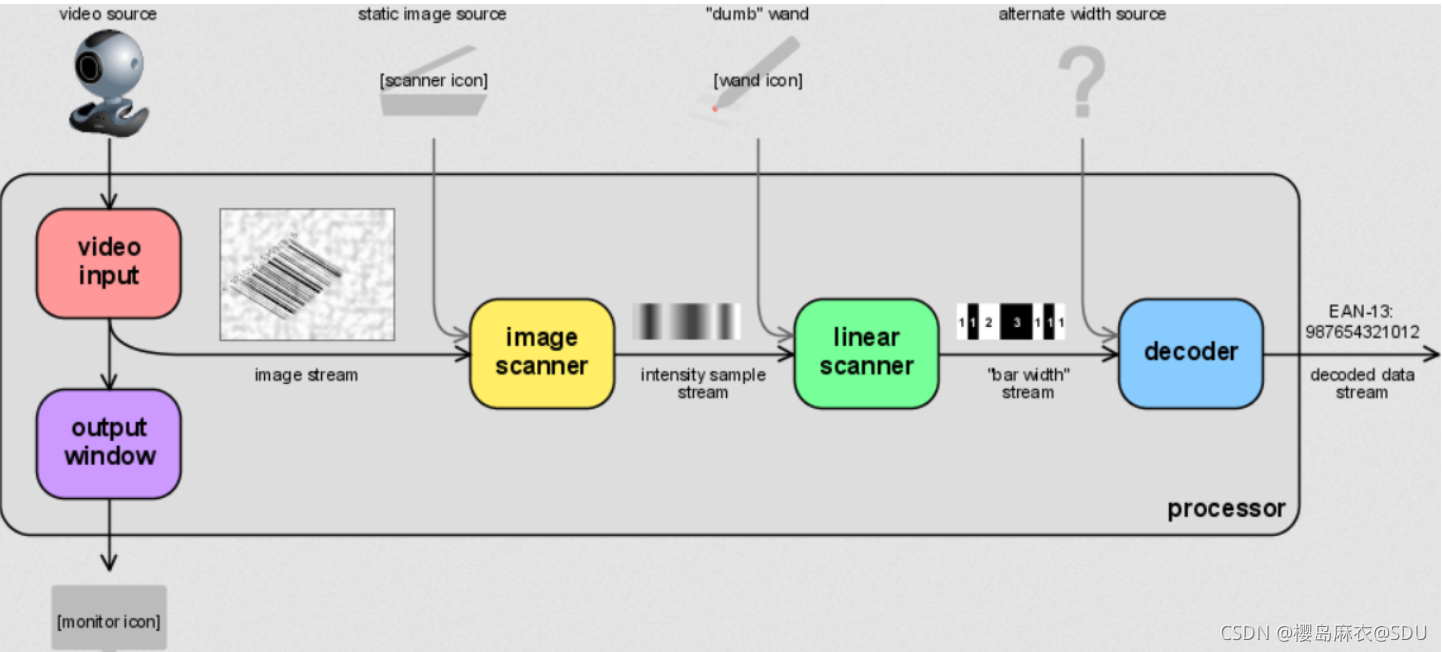
除此之外,根据ZBar的项目流程,可以看到,Window模块还有一个核心功能为将图像显示到用户指定的特定于平台的输出窗口。
ZBar项目的核心代码大部分都在zbar文件夹下,而zbar文件夹下的window.h和window.c则负责了这一模块的核心功能实现,而具体的调用实现则是在Processor处理模块以及其他api中完成。
本次代码分析将继上次代码分析展开window.c的解析。
二、代码分析
zbar_window_redraw
inline int zbar_window_redraw (zbar_window_t *w)
{
    int rc = 0;
    zbar_image_t *img;
    if(window_lock(w))
        return(-1);
    if(!w->display || _zbar_window_begin(w)) {
        (void)window_unlock(w);
        return(-1);
    }

    img = w->image;
    if(w->init && w->draw_image && img) {
        int format_change = (w->src_format != img->format &&
                             w->format != img->format);
        if(format_change) {
            _zbar_best_format(img->format, &w->format, w->formats);
            if(!w->format)
                rc = err_capture_int(w, SEV_ERROR, ZBAR_ERR_UNSUPPORTED, __func__,
                                     "no conversion from %x to supported formats",
                                     img->format);
            w->src_format = img->format;
        }

        if(!rc && (format_change || !w->scaled_size.x || !w->dst_width)) {
            point_t size = { w->width, w->height };
            zprintf(24, "init: src=%.4s(%08x) %dx%d dst=%.4s(%08x) %dx%d\n",
                    (char*)&w->src_format, w->src_format,
                    w->src_width, w->src_height,
                    (char*)&w->format, w->format,
                    w->dst_width, w->dst_height);
            if(!w->dst_width) {
                w->src_width = img->width;
                w->src_height = img->height;
            }

            if(size.x > w->max_width)
                size.x = w->max_width;
            if(size.y > w->max_height)
                size.y = w->max_height;

            if(size.x * w->src_height < size.y * w->src_width) {
                w->scale_num = size.x;
                w->scale_den = w->src_width;
            }
            else {
                w->scale_num = size.y;
                w->scale_den = w->src_height;
            }

            rc = w->init(w, img, format_change);

            if(!rc) {
                size.x = w->src_width;
                size.y = w->src_height;
                w->scaled_size = size = window_scale_pt(w, size);
                w->scaled_offset.x = ((int)w->width - size.x) / 2;
                w->scaled_offset.y = ((int)w->height - size.y) / 2;
                zprintf(24, "scale: src=%dx%d win=%dx%d by %d/%d => %dx%d @%d,%d\n",
                        w->src_width, w->src_height, w->width, w->height,
                        w->scale_num, w->scale_den,
                        size.x, size.y, w->scaled_offset.x, w->scaled_offset.y);
            }
            else {
                /* unable to display this image */
                _zbar_image_refcnt(img, -1);
                w->image = img = NULL;
            }
        }

        if(!rc &&
           (img->format != w->format ||
            img->width != w->dst_width ||
            img->height != w->dst_height)) {
            /* save *converted* image for redraw */
            zprintf(48, "convert: %.4s(%08x) %dx%d => %.4s(%08x) %dx%d\n",
                    (char*)&img->format, img->format, img->width, img->height,
                    (char*)&w->format, w->format, w->dst_width, w->dst_height);
            w->image = zbar_image_convert_resize(img, w->format,
                                                 w->dst_width, w->dst_height);
            w->image->syms = img->syms;
            if(img->syms)
                zbar_symbol_set_ref(img->syms, 1);
            zbar_image_destroy(img);
            img = w->image;
        }

        if(!rc) {
            point_t org;
            rc = w->draw_image(w, img);

            org = w->scaled_offset;
            if(org.x > 0) {
                point_t p = { 0, org.y };
                point_t s = { org.x, w->scaled_size.y };
                _zbar_window_fill_rect(w, 0, p, s);
                s.x = w->width - w->scaled_size.x - s.x;
                if(s.x > 0) {
                    p.x = w->width - s.x;
                    _zbar_window_fill_rect(w, 0, p, s);
                }
            }
            if(org.y > 0) {
                point_t p = { 0, 0 };
                point_t s = { w->width, org.y };
                _zbar_window_fill_rect(w, 0, p, s);
                s.y = w->height - w->scaled_size.y - s.y;
                if(s.y > 0) {
                    p.y = w->height - s.y;
                    _zbar_window_fill_rect(w, 0, p, s);
                }
            }
        }
        if(!rc)
            rc = window_draw_overlay(w);
    }
    else
        rc = 1;

    if(rc)
        rc = _zbar_window_draw_logo(w);

    _zbar_window_end(w);
    (void)window_unlock(w);
    return(rc);
}
上次代码分析中提到zbar_window_draw()函数,实现了将图像输出到某一平台或界面上的功能。而这个函数实现了对最后一张图像的重新渲染,可以理解成zbar_window_draw()的进一步操作。
对比代码内容可以看出,zbar_window_redraw()相对于zbar_window_draw()增加了图像曝光部分的功能。
下面对代码中涉及的算法进行介绍。
亮度感应及曝光
感光宽容度
从最明亮到最黑暗,假设人眼能够看到一定的范围,那么胶片(或CCD等电子感光器件)所能表现的远比人眼看到的范围小的多,而这个有限的范围就是感光宽容度。
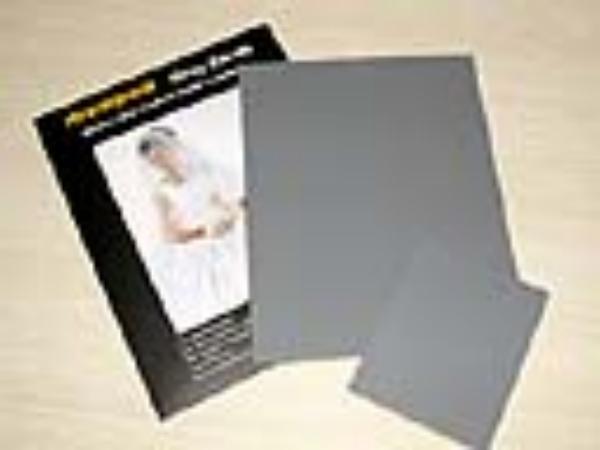
自动曝光和18%灰
对于sensor来说,又是如何来判断曝光是否正确呢?很标准的做法就是在YUV空间计算当前图像的Y值的均值。调节各种曝光参数设定(自动或手动),使得该均值落在一个目标值附近的时候,就认为得到了正确的曝光。
那么如何确定这个Y的均值,以及如何调整参数使得sensor能够将当前图像的亮度调整到这个范围呢?
这就涉及到一个概念 18%灰,一般认为室内室外的景物,在通常的情况下,其平均的反光系数大约为18%,而色彩均值,如前所述,可以认为是一种中灰的色调。这样,可以通过对 反光率为18%的灰板拍摄,调整曝光参数,使其颜色接近为中等亮度的灰色(Y值为128)。
gamma校正
曝光的均值正确了,不代表整体图像的亮度分布就和人眼所看到的保持一致了。
事实上,人眼对亮度的响应并不是一个线性的比例关系,而各种涉及到光电转换的设备的输入输出特性曲线一般也是非线性的,且表现为幂函数的形式,所以整个图像系统的传递函数是一个幂函数: g=g 1× g 2×…× g n
对于sensor来说,其响应倒是接近为线性关系,所以为了在各种设备上正确输出符合人眼对亮度的响应的图像,就需要进行校正。
幂函数的指数的倒数就是通常所说的gamma值。
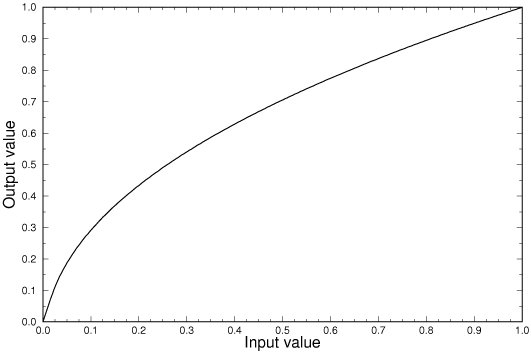
归一化的gamma曲线
实际上,sensor在做gamma校正的时候,通常也一并作了从raw格式的10bit的数据到8bit数据的转换,所以这时候的公式可以表示为对比度。
窗口图层覆盖
static inline int window_draw_overlay (zbar_window_t *w)
{
    if(!w->overlay)
        return(0);
    if(w->overlay >= 1 && w->image && w->image->syms) {
        /* FIXME outline each symbol */
        const zbar_symbol_t *sym = w->image->syms->head;
        for(; sym; sym = sym->next) {
            uint32_t color = ((sym->cache_count < 0) ? 4 : 2);
            if(sym->type == ZBAR_QRCODE)
                window_outline_symbol(w, color, sym);
            else {
                /* FIXME linear bbox broken */
                point_t org = w->scaled_offset;
                int i;
                for(i = 0; i < sym->npts; i++) {
                    point_t p = window_scale_pt(w, sym->pts[i]);
                    p.x += org.x;
                    p.y += org.y;
                    if(p.x < 3)
                        p.x = 3;
                    else if(p.x > w->width - 4)
                        p.x = w->width - 4;
                    if(p.y < 3)
                        p.y = 3;
                    else if(p.y > w->height - 4)
                        p.y = w->height - 4;
                    _zbar_window_draw_marker(w, color, p);
                }
            }
        }
    }

    if(w->overlay >= 2) {
        /* calculate/display frame rate */
        unsigned long time = _zbar_timer_now();
        if(w->time) {
            int avg = w->time_avg = (w->time_avg + time - w->time) / 2;
            point_t p = { -8, -1 };
            char text[32];
            sprintf(text, "%d.%01d fps", 1000 / avg, (10000 / avg) % 10);
            _zbar_window_draw_text(w, 3, p, text);
        }
        w->time = time;
    }
    return(0);
}
一张完整的图像可能是由若干个大小不同的图层组成的。如果由计算机将这若干个图层渲染成一张完整的图像,则需要根据图层的z值(也可以理解为远近关系,z值越大,从视觉角度来看,图层被显现的内容越多),所以,一般渲染过程,就是将图层根据z值进行升序排序,然后从z值最小的图层开始依次渲染。每个图层都是固定大小的矩形(即使生活中我们看到各种形状的图形,它们其实是被包含到一个矩形区域"RGBA画布"中)。
图层之间的关系模型,可以看成是上层(z值大)图层依赖下层(z值小)图层。约定上层图层只能依赖下层图层(在算法实现中,上层图层只依赖了一个下层图层,目的是为了让图层之间的关系更简单),所以就不会不存在闭环,但是一个图层可以被多个上层图层依赖。
三、总结
本次代码分析对Window模块的几个函数进行了说明和算法分析,如有不足,请指正。